

Ingredients
(Tip: You'll find the full list of ingredients and measurements in the recipe card below.)
For the Earl Grey Tea Concentrate:
1 ½ cups water
3 tablespoons loose-leaf Earl Grey tea or 9 Earl Grey tea bags
¼ cup granulated sugar
1 tablespoon pure vanilla bean paste or vanilla extract
Pinch of kosher salt
For the Mascarpone Whipped Cream
1 ¼ cups cold heavy cream
8 oz cold mascarpone
1 tablespoon pure vanilla bean paste or vanilla extract
4 large pasteurized egg yolks
½ cup granulated sugar
Pinch of kosher salt
For Assembly:
About 26 ladyfingers
Directions
I start by making the Earl Grey tea concentrate. I bring the water to a boil in a medium saucepan, add the tea, lower the heat, and let it simmer until deeply aromatic and strong. Once strained, I whisk in the sugar, vanilla, and salt, then let it cool completely.
Next, I prepare the mascarpone whipped cream. I whip the cold heavy cream until soft peaks form, then add the mascarpone and vanilla and mix just until smooth. I transfer this mixture to a bowl and set it aside.
In the same mixer bowl, I beat the egg yolks, sugar, and salt until the mixture is pale, fluffy, and doubled in volume. I gently fold in half of the mascarpone cream, then fold in the remaining half until everything is silky and well combined.
To assemble, I quickly dip each ladyfinger into the cooled Earl Grey tea and arrange them in a single layer in an 8-inch square pan. I spread half of the cream on top, then repeat with another layer of soaked ladyfingers and the remaining cream.
I loosely cover the dish and refrigerate it for at least 8 hours, preferably overnight, so the flavors meld and the texture sets beautifully.
Servings and timing
This recipe makes 8 servings.
Prep time: 10 minutes
Cook time: 30 minutes
Chilling time: 8 hours
Total time: about 8 hours and 40 minutes
Variations
When I want to change things up, I sometimes add finely grated orange zest to the mascarpone cream to enhance the citrus notes of the Earl Grey. I also like sprinkling the top with cocoa powder or finely crushed tea cookies for texture. For an extra-luxurious version, I occasionally brush the ladyfingers with a splash of orange liqueur mixed into the tea.
Storage/Reheating
I store this tiramisu tightly wrapped in the refrigerator for up to 3 days. Since it’s a chilled dessert, I never reheat it. I simply slice and serve straight from the fridge.
FAQs
Can I make this tiramisu ahead of time?
Yes, I actually prefer making it a day in advance because the flavor and texture improve after chilling overnight.
Is this recipe safe with egg yolks?
I use pasteurized egg yolks, which makes this recipe safe to enjoy without baking.
Can I use tea bags instead of loose-leaf tea?
I often do. Both work well, as long as the tea is brewed very strong.
What pan size works best for this recipe?
I use an 8-inch square pan, which gives me neat layers and perfect portions.
Can I freeze Earl Grey tiramisu?
I don’t recommend freezing it, as the mascarpone cream can lose its smooth texture once thawed.
Conclusion
This Earl Grey tiramisu is one of my favorite ways to reinvent a classic dessert. I love how light, fragrant, and creamy it is, and how effortlessly elegant it feels without turning on the oven. Whether I’m serving it for afternoon tea or as a summer dinner-party finale, it never fails to impress.
📖 Recipe:

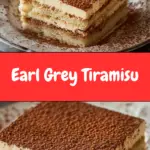
Earl Grey Tiramisu
5 Stars 4 Stars 3 Stars 2 Stars 1 Star
No reviews
- Author: Cheryl
- Total Time: 8 hours 40 minutes
- Yield: 8 servings
- Diet: Vegetarian
Description
A light, elegant twist on classic tiramisu made with fragrant Earl Grey tea-soaked ladyfingers layered with airy mascarpone cream. This no-bake dessert is chilled, creamy, and beautifully aromatic.
Ingredients
1 ½ cups water
3 tablespoons loose-leaf Earl Grey tea or 9 Earl Grey tea bags
¾ cup granulated sugar (divided)
2 tablespoons vanilla bean paste or vanilla extract (divided)
2 pinches kosher salt (divided)
1 ¼ cups cold heavy cream
8 oz cold mascarpone cheese
4 large pasteurized egg yolks
About 26 ladyfingers
Instructions
- In a medium saucepan, bring the water to a boil. Add the Earl Grey tea, reduce heat, and simmer until deeply aromatic. Strain the tea and whisk in ¼ cup sugar, 1 tablespoon vanilla, and a pinch of salt. Let cool completely.
- In a mixer, whip the cold heavy cream until soft peaks form. Add the mascarpone and 1 tablespoon vanilla, mixing just until smooth. Transfer to a bowl and set aside.
- In the same mixer bowl, beat the egg yolks with the remaining ½ cup sugar and a pinch of salt until pale, fluffy, and doubled in volume.
- Gently fold half of the mascarpone cream into the egg mixture, then fold in the remaining half until silky and well combined.
- Quickly dip each ladyfinger into the cooled Earl Grey tea and arrange in a single layer in an 8-inch square pan.
- Spread half of the mascarpone cream over the ladyfingers. Repeat with another layer of soaked ladyfingers and the remaining cream.
- Cover loosely and refrigerate for at least 8 hours, preferably overnight, before serving.
Notes
Use pasteurized egg yolks for safety.
For extra citrus flavor, add finely grated orange zest to the cream.
Optional topping ideas include cocoa powder or crushed tea cookies.
Best made a day ahead for optimal flavor and texture.
- Prep Time: 10 minutes
- Cook Time: 30 minutes
- Category: Dessert
- Method: No-Bake
- Cuisine: Italian-Inspired
Nutrition
- Serving Size: 1 slice
- Calories: 420
- Sugar: 28g
- Sodium: 120mg
- Fat: 26g
- Saturated Fat: 15g
- Unsaturated Fat: 9g
- Trans Fat: 0g
- Carbohydrates: 38g
- Fiber: 1g
- Protein: 7g
- Cholesterol: 165mg


