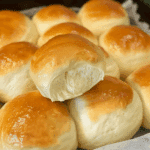
These homemade Soft and Buttery Homemade Dinner Rolls are a true comfort food. Soft, fluffy, and buttery, they’re perfect as a side dish for any meal. With a touch of sweetness and a melt-in-your-mouth texture, they’ll be the star of your dinner table. Whether you're serving them at a family gathering or just for a cozy dinner at home, these rolls are guaranteed to impress.

Ingredients
4 cups (500g) all-purpose flour
¼ cup (50g) sugar
1 packet (2 ¼ tsp) instant yeast
1 teaspoon salt
1 cup (240ml) warm milk
¼ cup (60g) butter, melted
1 egg
Extra melted butter for brushing
(Tip: You'll find the full list of ingredients and measurements in the recipe card below.)
Directions
In a large bowl, I mix together the flour, sugar, yeast, and salt.
Next, I add the warm milk, melted butter, and egg to the dry ingredients. I stir everything together until it's well combined.
Then, I knead the dough for about 5-7 minutes, either by hand or using a stand mixer, until it becomes smooth and elastic.
After that, I cover the dough with a towel and let it rise for 1-2 hours, or until it doubles in size.
Once the dough has risen, I punch it down and divide it into 12 equal pieces.
I roll each piece into a smooth ball and place them in a greased 9x13-inch baking pan.
I cover the pan and let the rolls rise again for 30-45 minutes, until they puff up.
While the rolls rise, I preheat the oven to 375°F (190°C).
After the rolls have puffed up, I bake them for 20-25 minutes, or until they're golden brown.
As soon as they come out of the oven, I brush them with extra melted butter to give them that irresistible buttery finish.
I let the rolls cool slightly before serving. Then, I pull them apart and enjoy their soft texture!
Servings and Timing
Prep Time: 15 minutes
Cooking Time: 25 minutes
Total Time: 1 hour 45 minutes
Servings: 12 rolls
Variations
Herbed Rolls: For a savory twist, I sometimes add a teaspoon of dried rosemary or thyme to the dough for a subtle herb flavor.
Cheese Rolls: I’ve also made cheesy rolls by folding in shredded cheddar cheese into the dough before baking. It adds a wonderful gooeyness.
Sweet Rolls: If I want to make them extra sweet, I might drizzle a bit of honey or icing on top of the rolls after baking.
Garlic Butter Rolls: For garlic lovers, I brush the rolls with a garlic butter mixture instead of plain melted butter after baking.
Storage/Reheating
I store any leftover rolls in an airtight container at room temperature. They’ll stay fresh for about 2-3 days. If I need to store them for longer, I freeze them for up to a month. To reheat, I place the rolls in the microwave for about 20 seconds, or I warm them in the oven at 350°F (175°C) for 5-10 minutes. They always come out soft and delicious!
FAQs
How do I know if the dough has risen enough?
When the dough has doubled in size, it’s ready to be punched down and shaped. A quick way to test it is by gently pressing your finger into the dough – if the indentation remains, it’s risen enough.
Can I make the dough ahead of time?
Yes, you can! If I want to make these rolls in advance, I let the dough rise once, then punch it down and store it in the fridge for up to 24 hours. When I’m ready to bake, I let the dough come to room temperature before proceeding with the shaping and second rise.
What if I don’t have instant yeast?
If I don’t have instant yeast, I can substitute it with active dry yeast. I just need to activate it in warm milk before mixing it into the dough.
Can I make these rolls without a stand mixer?
Yes! I’ve made them by hand many times. The key is to knead the dough thoroughly for 5-7 minutes until it’s smooth and elastic. It’s a great way to get a little workout in, too!
Why are my rolls dense instead of fluffy?
Dense rolls can happen if the dough is not kneaded enough, or if it wasn’t given enough time to rise. I always make sure to give the dough plenty of time to rise in a warm, draft-free environment. If the dough hasn’t risen enough, the rolls may not be as fluffy.
Conclusion
These soft and buttery homemade dinner rolls are always a favorite in my house. They’re easy to make and result in the fluffiest, most flavorful rolls that pair with almost any meal. The process is simple and the results are absolutely worth the effort. Whether I’m serving them at a holiday dinner or just enjoying them with a weeknight meal, they never disappoint. I can’t wait for you to try them!
Recipe:

Soft and Buttery Homemade Dinner Rolls
5 Stars 4 Stars 3 Stars 2 Stars 1 Star
No reviews
- Author: Cheryl
- Total Time: 1 hour 45 minutes
- Yield: 12 rolls
- Diet: Vegetarian
Description
These homemade dinner rolls are soft, fluffy, and buttery, with a slight sweetness that makes them perfect as a side dish for any meal.
Ingredients
4 cups (500g) all-purpose flour
¼ cup (50g) sugar
1 packet (2 ¼ tsp) instant yeast
1 tsp salt
1 cup (240ml) warm milk
¼ cup (60g) butter, melted
1 egg
Extra melted butter for brushing
Instructions
- In a large bowl, mix together the flour, sugar, yeast, and salt.
- Add the warm milk, melted butter, and egg to the dry ingredients and stir until well combined.
- Knead the dough for 5-7 minutes until smooth and elastic, either by hand or using a stand mixer.
- Cover the dough with a towel and let it rise for 1-2 hours, or until it doubles in size.
- Punch the dough down and divide it into 12 equal pieces.
- Roll each piece into a smooth ball and place them in a greased 9x13-inch baking pan.
- Cover the pan and let the rolls rise again for 30-45 minutes until puffed up.
- Preheat the oven to 375°F (190°C).
- Bake the rolls for 20-25 minutes, or until golden brown.
- Brush the baked rolls with extra melted butter.
- Let the rolls cool slightly before serving.
Notes
For a savory variation, add a teaspoon of dried rosemary or thyme to the dough.
To make cheese rolls, fold in shredded cheddar cheese before baking.
For sweet rolls, drizzle honey or icing on top after baking.
For garlic butter rolls, brush the rolls with garlic butter instead of plain melted butter after baking.
- Prep Time: 15 minutes
- Cook Time: 25 minutes
- Category: Side Dish
- Method: Baking
- Cuisine: American
Nutrition
- Serving Size: 12 roll
- Calories: 180
- Sugar: 5g
- Sodium: 200mg
- Fat: 7g
- Saturated Fat: 4g
- Unsaturated Fat: 2g
- Trans Fat: 0g
- Carbohydrates: 25g
- Fiber: 1g
- Protein: 4g
- Cholesterol: 30mg


